22.6.2 File processing
Each canvas can be considered a widget and also has an individual widget file, which can be stored in the widget or downloaded to the hard drive.
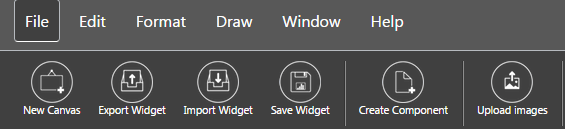
This section will introduce the operations provided by the "File". The role is the widget with the canvas as the object. The provided functions include a newly established canvas, widget storage, input and output of the established widget, setup components, and uploading of the image to the server.
22.6.2.1 New canvas
Each widget uses a canvas as its basic unit.
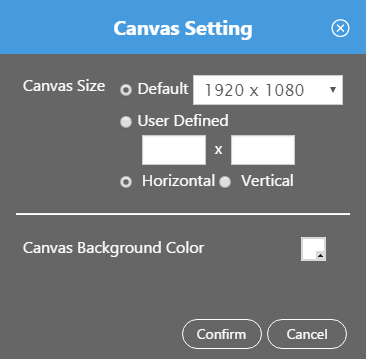
To create a new widget, select "New Canvas" under "File” icon. In the dialog box alongside the canvas, select or enter the canvas size; a new canvas is thus created.
If the user decides to use “User Defined” canvas size, the limitation ranges are from 600 to 4000 pixel.
Other related options include a horizontal canvas, straight canvas, and canvas background color for selection.
l Canvas property settings
After creating a new canvas, select the basic canvas settings in the property window.
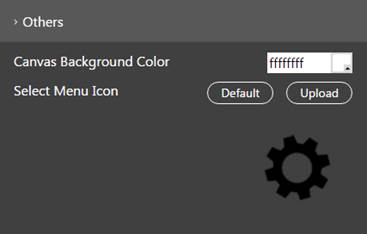
n Canvas background color. You can set the canvas background fill color.
n Select widget to represent icon. Here, you can set a canvas as the Widget and then select the icon from the Widget toolbox in the Dashboard editor.
u When the canvas has not been saved yet, it will be represented by a system icon.
u After saving the canvas, the icon is defaulted to the widget screenshot. The system will automatically produce the icon based on the maximum range of the objects in the canvas. Press the "Preset" button. The icon will be automatically updated whenever the canvas is saved.
u You can also upload the diagram developed separately. The recommended size is 128 x 128 (pixels).
22.6.2.2 Export Widget
The saved widget can be output to the hard drive for reuse in other projects. 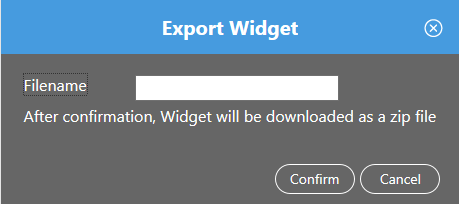
To output the widget, click “Widget Output” from the file menu, and input the file name in the dialog window. After confirmation, download the current canvas content as a zip file.
The default location of the output file is saved to C:\Users\......\Downloads.
22.6.2.3 Import Widget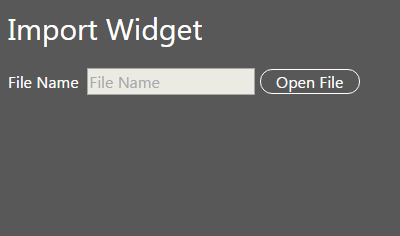
Select the "Widget Input" icon from the file menu, which makes the Input Widget dialog box pop up; press "open file" to select the zip file to be input, and the contents can be output on the canvas.
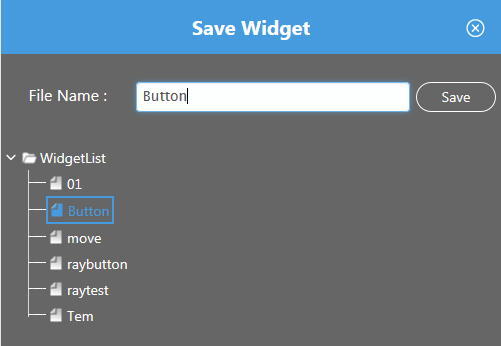
22.6.2.4 Save Widget
The canvas’s components will be stored in widget files and all the saved widgets can be seen in the Widget list tree diagram.
To save a modified canvas, click the "Save Widget" icon and input the name. Then press the "Save" button to save the contents of this file. If the file name already exists, a dialog box will pop up to confirm the replacement.
To save the existing widget, click on the file name in the Widget list.
22.6.2.5 Create Component
The user can separately save a component in the canvas, or use in another canvas; please see the drawing -> component for related content.
First, select the objet on the canvas or the object after group and then click "Component Creation"; a dialog window will pop up. Enter the file name and save. Then you have saved the selected object as a component.
22.6.2.6 Upload Image
The images used in the canvas shall be selected from the server. The user can upload the machine’s images to the server. Limitations to upload either a PNG file or GIF file format. The total file size cannot be above 10 MB, if it is a GIF file, its frames images can’t greater than 20 frames, and its frame refresh rate can’t be less than 0.1 second.
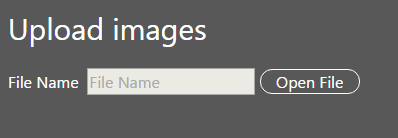
To upload an image, a dialog box will pop up after clicking on the "upload image" icon. Click the image file after pressing the "open file" button to upload the image file to the server’s end. Currently, PNG and GIF formats are supported.